Monday, August 21, 2017

Porch Boards Become One of a Kind Kitchen Bar

When Greg removed our porch boards a year ago, he thought he would save them for something special.
The original porch boards prior to being removed.

They were made of heart pine, a rare wood today, but buried under layers of paint.  When he made the suggestion of reusing them, I had a hard time imaging what they might look like.  (A problem I encounter due to no creative vision.)  I let the comment slide, knowing that Greg is the artisan, I am along for the ride.  I had a hard time wrapping my mind around them being worth much and I was more upset about them being in our front courtyard until he found time for yet another project.

 They had weathered 90 years of foot traffic and Charleston humidity and if those boards could have talked, they had seen many styles of cars and various charcters pass by on the streets.  They were a piece of history and putting up with the clutter might be worthwhile.  A majority of this debris ended up being recycled or trashed, the porch boards are protected under the gray tarp.  Did I mention storage is a continual problem on our job.

While our front room is torn down to the studs, and the intense heat and humidity rules the outdoors here in the Holy City, Greg felt he would do indoor finished carpentry.  He began to prepare the porch boards for the bar project by running the wood through a planer multiple times.  It was so noisy, our neighbors questioned what he might be doing.  He worked during the middle part of the day to avoid disturbing them further.   I, too, wore ear plugs inside attempting to get my own work done.
The porch boards are on the far right, and these in the center are ripped to the appropriate size.

Greg ripped the boards down to a 1 3/8" pieces and turned them on end to give the bar a butcher block pattern.  He alternated the light and dark pieces for variety.

I applied glue to the pieces and Greg assembled them because he was on a time crunch to keep the glue from setting up. These processes never go as planned, and much of the beauty of the project is its natural imperfections. The color of the heart pine was so stunning, he decided to go natural with the wood color.  He used a butcher block sealer which is food safe because we will be eating on this surface.


Our island top which is on wheels.


We removed the awnings in early summer and recycled the aluminum.  The letter "M" found on the awnings showed a beautiful green petina.  The letter stood for the Moultrie family who had owned the home since 1940. We are only third owners in more than 90 years.  We thought we would keep this "M" to mount on more of the porch wood with a tribute to the Moultrie family on a brass plaque in the corner.  Greg stained the frame a dark color.  I am so glad I didn't squelch Greg's idea, I would have missed out on a few great conversation pieces for our Freedman's Cottage!
The awning "M"'s plaque.  The wood will be stained and hung on our piazza, Charleston's term for porch.
In the next weeks, Greg is beginning to ready the outside for additional siding.  The end of the house will need to be torn off and rebuilt due to the amount of rot in the framing.  The outside must be completed before the inside can be started. As we look back, we are amazed at how far we have come, but recently a friend came to call.  She said it best when she stated, we still have a ways to go.
Thank you for checking out our project.

Saturday, May 13, 2017

Placing Concrete Counters

This experience has been so much longer and harder than either Greg or I expected.  The foundation and underbelly of our cottage had to be replaced except for the two original 1929 rooms.  Greg decided to build three new rooms on the "wing" due to extensive water damage.  He felt it easier to build back new.
We have been enjoying our two new bedrooms and Jack and Jill bath.  While new flooring and tile have given it a updated appearance, trim and final coats of paint still need to be done.  Greg has currently got one coat of enamel paint on all of the bathroom trim you see here, but another is needed.  Also, our final bath mirror has not been installed.  


 Greg installed a modified antique mahogany dresser refinished to act as a double sink vanity.   

 The wainscoting is solid wood and lightens up the small space.  Here is one coat of a bright white oil based enamel which should last for years to come.  He likes the wear of oil on trim though many are choosing to use a latex gloss which is easier to clean up and does not require the drying time. 
The wall color is SW Historic Charleston Eliza Lucas, 125%. This color is carried throughout the master bedroom, also. 

In our front courtyard stood a overgrown bush that rather looked like a tree.  We had long since reduced it's gnarly limbs to a stump, but Greg had wanted to grow vegetables in this plot of soil.  We have missed having fresh vegetables and herbs to pick.  Ethan, our son, was down for SEWE in February and before he left, they both wrestled with this old stump.  It gave a hard fight, but with much digging and prying, it gave up its roots leaving us with a clean slate.  He embellished our soil with mushroom compost and bone meal; planted tomatoes, kale, zucchini, crooked neck yellow squash, green beans, and Brussels sprouts as well as a variety of lettuces.  


 We were able to share many canna lily bulbs with friends and family that were planted here decades earlier.  We have heard good reports that they have been multiplied and are thriving all over Charleston.  If you got some of these heirloom bulbs, we hope you enjoy them for years to come.

A small project we tackle over a weekend was to install a set of metal sconces turned on their end to candle-lever our bar lights over the coming wooden bar. (pictured below)  The flat kitchen ceiling transitions to a vaulted ceiling over the sitting area making traditional hanging difficult.  These sconces were purchased from an architectural salvage store on King Street several months earlier.  We were told they were taken from the Charleston home of  Ted Turner's daughter.  

Greg worked on our counter-tops.  He purchased half bull nose molds and platinum coloring from Cheng, a counter-top supplier.  (The home stores do not carry much in the way of added materials.)  Greg has had extensive experience with pouring outdoor concrete projects, but he had never poured concrete indoors.  These pictures show the bull-nose forms which are filled and then broken off the concrete once it dries.


He taped off the entire area so that our cabinets were not affected.  Added steel to the concrete to bring added strength and keep it from cracking and then he started placing 9 bags of Sakcrete 500.  He had to float and steel trowel it to its finished top.  Both of us were a bit nervous because tearing them out would be a nightmare.  But our worries were futile because as you can see they came out beautifully.  We loved the half-bullnosed side.


This is the raw product.  He covered them in acrylic to make them less porous and buffed them with a wax finish.  Below is the back splash that we are considering to bring the colors of the maple cabinets and concrete counters together.  The concrete feels like a natural stone.

This was a cool and rainy weekend in Charleston and the semi-annual Greek festival was in full swing within our city block.  Moving our vehicles would mean losing our parking space and a rather long walk to the house motivating us to work inside the house.  Last week on Friday, Greg tore out our final room to expose our ceiling beams and open the walls for repair.  He and I loaded over 1600 lbs of debris and took it to the landfill on Saturday morning.  Needless to say, we did nothing else on the house the remainder of the weekend.  We
were so glad to see the majority of our demolition completed.  This is dirtiest part of the job.  Most of this has not seen the light of day in 90 years.  Above is our exposed fireplace, part of it covered in plaster.  Once he sees the condition, we can make decisions on how to repair it.  The kitchen side of the fireplace is in much better condition.  

    One of the most difficult issues we have is storage for Greg's tools and construction debris.  We have no outside storage and want to have things readily available.
Today, Greg opened up the firebox and we were pleasantly surprised to find it in good condition.  Both sides were bricked up.  He is saving these bricks for our patio in the backyard area.  They are much newer than the bricks used for the fireplace.  A chimney was dismantled in the original kitchen.  Those brick match the fireplace and can be used as replacements.  It has been awhile since we updated you on progress.  We hope to see the inside mostly complete in the next several weekends.  

Sunday, December 25, 2016

Just in Time for Cold Weather

Just as the cooler temps began, our Lake Murray rental property came up for renewal.  We decided to bite the bullet and update it for sale.  We need the infusion of capital to finish our Charleston redo and it's time to "Let it Go!"  We took 6 weekends and made it shiny new.  I have included a few before and afters. This was our family home for many years and our emotional connection is still here along with many friends.  It will be nice to see it enjoyed by a new family.  Notice the before pictures above and the after pictures below. Greg is truly amazingly fast and does quality work.  Our boys and an added friend came in for a Saturday to put down the bulk of the hardwoods.  It was amazing to see the degree of difference.


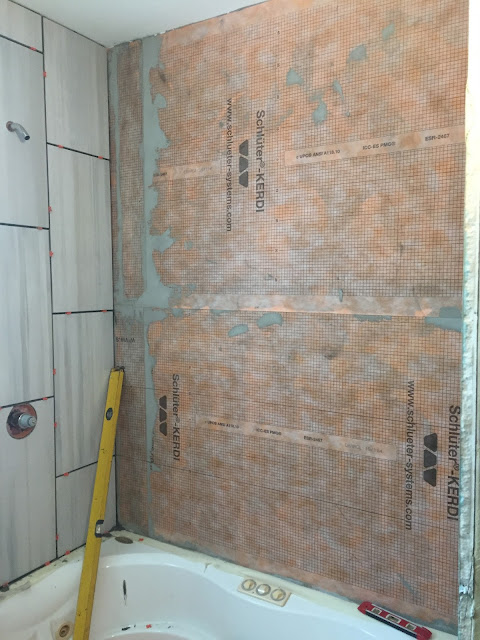
As we have worked to get paint on the walls, most of the finishes that have made the space livable is the tile in the main bath and the hardwood floors in both of the bedrooms.  Greg likes using the waterproof Schluter membrane behind the tile.  It replaces tile board and provides a better water barrier.  We were out to dinner with a tile provider and looking at Greg's work, he felt he had done a professional job.


The tile work is beginning

The finished look

We continued the same tile on the floor
We wanted a modern tile and went with a 12 X 24 using it on both the shower and the floors.  We are using a Charleston Historic Sherwin Williams color on the walls, Eliza Lucas at 125% in the bath.

After the tile was grouted, Greg installed the vanity which he had been refinishing for a few weeks.  He restricted the top drawers to accommodate the square sinks.  He added a back-splash made of a matching piece of mahogany.  We are happy we decided to leave it a stained piece for interest.  


Right before Thanksgiving, Greg invested a long weekend laying a hand-scrapped engineered hardwood floor that looked even better down than in the showroom.  We were very pleased with how it turned out.  Even though some of these finishes are helping with cleaning up our spaces, our trim and wardrobe are yet come.  
Preparing to lay the hardwood floor in the Master Bedroom
We are not finished, but it's looking so much better.  We are soon to be painting walls with a second coat and have all the trim to paint. Exciting days to see it all coming together.  Until next time, have a great holiday season with family and friends.

Saturday, July 23, 2016

Moving Inside to Mud, Mud and More Mud

Getting the drywall hung has made the rooms come alive.  I am already considering colors and furniture placement though to some that may be premature.  A girl can dream, can't she?  

Back to reality because drywall dust and sheetrock mud have to be the most frustrating thing to renovators who live in the midst of the work.  As excited as we are to be picking out our bathroom tile and bedroom flooring, sweeping and mopping floors in the main area these days while Greg is mudding the walls, seems like a lost cause.  With each sanding process, it "rains" compound dust.  I have decided a good sweep at the end of the day is the best use of my time!


Last weekend, this is where Greg started.  After getting all areas covered with gypsum, the mudding process started.  He had what seemed like miles and miles to go before the first coat was on and the joints taped.  It was pretty much all he got done over the 2 day weekend.


For someone who does not do this on a daily basis, it is quite physcially taxing.  We are using fans to bring in air conditioned air from the main house, but up nearer the ceilings, it remains hot.
The spare bedrooms is waiting on it's second coat of mud.
Greg is nearing his final sand and ready for primer to seal the walls.  In talking about walls, we are going to limit our shiplap to one accent wall in each room.  We are using the wood siding for this treatment and will not have enough to do all three walls as we had originally thought.  We are considering what finish we will give to the wood.
These two pictures are of our half bath.  We added a antique crib to the wall for a multipurpose towel rack, toilet paper holder and magazine rack.  The cabinet in the back is one from the kitchen area sized to fit the space for added storage.


Some of the decisions on upcoming material finishes include our two wall colors for the bedrooms and main bath.  We want to keep all three rooms coordinated because of the small space. Currently, we are looking at these two main colors Aiken Ivory and Eliza Lucas, both Historic Charleston colors.  In the next blog, I'll show off more of the materials we are choosing for the finishes.  Stay cool as the dog days of summer continue.  We are excited to see some of this project come to  the finishing stages.  We are predicting at lease 6 months of weekend projects.